Mounting tires on your Nissan Altima using the original equipment manufacturer (OEM) size is straightforward when you follow the correct steps. Getting it right ensures your car handles as designed, maintains fuel efficiency, and keeps your warranty valid. Skipping proper procedures can lead to uneven wear, poor handling, or even safety risks.
What does OEM tire mounting mean for a Nissan Altima?
The OEM tire size for your Altima is the exact specification set by Nissan during manufacturing. It’s listed on the driver’s side door jamb sticker and in your owner’s manual. Using this size means you’re replacing tires with ones that match the vehicle’s intended performance, ride quality, and speedometer accuracy. Deviating from OEM size can affect how the car steers, brakes, and responds to road conditions.
When should I replace tires using OEM specifications?
You should stick to OEM size when replacing tires due to wear, damage, or seasonal changes. For example, if your 2005 Nissan Altima has worn-out all-season tires and needs new ones, use the same size typically 215/60R16 or 225/50R17 depending on trim level. This keeps your alignment, suspension load, and traction systems working as intended.
How do I mount tires correctly on my Nissan Altima?
Start by ensuring the new tires are the correct OEM size. Use a torque wrench to tighten lug nuts in a star pattern this prevents wheel warping. Don’t over-tighten; follow the torque specs listed in your owner’s manual. After mounting, drive slowly for the first few miles to check for vibrations or noises.
Common mistakes to avoid
- Using mismatched tire sizes on front and rear axles. This affects handling and can trigger warning lights.
- Skipping the torque sequence. Tightening bolts in order can warp the brake rotor or damage the wheel hub.
- Ignoring tire rotation schedules. Even with OEM tires, rotating every 5,000 to 7,500 miles helps extend tread life.
- Not checking tire pressure after installation. Cold inflation pressure should match the sticker on the door jamb.
Practical tips for better results
Always inspect the tire bead and rim for damage before mounting. A bent rim or damaged bead can cause air leaks or blowouts. If you're unsure about mounting, take the job to a shop with a professional tire machine. Some local mechanics offer free mounting when you buy tires there.
After installing new OEM tires, reset the TPMS (tire pressure monitoring system) if needed. Many Altima models require a reset after tire changes check your vehicle-specific guide for details.
Next steps: What to do after mounting
Drive at low speeds for the first 100 miles to let the tires seat properly. Then, recheck tire pressure and verify no warning lights remain on the dashboard. Schedule an alignment check if you notice pulling to one side or uneven wear. For detailed steps on replacing tires with factory specs, review this step-by-step process.
If you're looking for a font that matches the clean, precise feel of automotive manuals, try font name for documentation or labels.
 Replacing Tires on a Nissan Altima with Factory Specifications
 Installing New Tires on Your Nissan Altima
 Properly Installing New Tires on Your Nissan Altima
 Understanding Nissan Altima Stock Wheel Specifications
 Changing Tire Size Affects Altima Fuel Economy and Handling
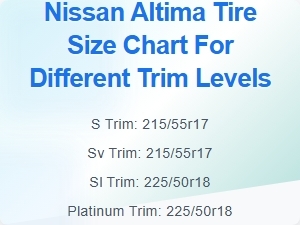 Nissan Altima Tire Sizes for All Trim Levels